

Are you looking for the most delicious pie recipe you've ever tried? Congratulations! You've found it!
But seriously, this is my all-time favorite pie by far. I even make my own pie crust. Back in New Hampshire, my LDS ward used to host an annual pie and cake auction every June or July to raise money for Girls' Camp and Scout Camp. It is our one fundraiser a year, so it's kind of a big deal. My signature dessert was this exact recipe. People would bid somewhere around $100 for a good cake or pie, and since a lot of people had tried my recipe, my pies always did really well. I tell you this not to brag, but to convey how serious I am about this being a sweet recipe (literally, ha ha...).
So when I cook or bake, I'm all about using as few dishes as possible. For this dessert, I usually get out two big bowls, one spatula, measuring cups (which I barely use if truth be told), a rolling pin, and of course a pie plate.
Pie Filling Ingredients Needed:
2 cups sliced strawberries (fresh are better!)
2 cups sliced rhubarb (1-2" pieces)
2/3 cup flour
1 1/2 cups sugar
1 Tbsp butter
Instructions:
Preheat the oven to 425 degrees. Mix the first four ingredients in a bowl and allow them to sit for a while...the sugar will liquify and create a pinkish glaze on the fruit. Begin making the bottom pie crust.
Pie Crust Recipe (made twice...once for the bottom crust, once for the top--I prefer not to double the recipe):
1 stick of salted butter (softened)
3 Tbsp shortening
1/4 tsp salt
2 cups flour
3-5 Tbsp cold water (start with 3, add more as needed)
Instructions (continued):
I think homemade pie crust is always better. I have never made this pie with store-bought crust, but you may try it if you dare. Otherwise, mix the pie crust ingredients in the order they are listed with a spatula (I usually just rinse the spatula I used to mix the pie filling). It won't look like much until you blend everything thoroughly. I start with 3 Tbsp of cold water and add additional as needed. Be careful not to add too much or you'll just have one soggy crust (which adding additional flour would probably fix). Take off any rings you might be wearing, and blend the dough by hand after mixing the best you can with the spatula.
Now you have a few options for getting the pie crust to come out successfully in one or two tries. First, you really need a pretty wide space...wider even than the circumference of the pie plate because the dough needs to extend over the sides. A wide counter (cleared off) or a kitchen table should work fine. Next, you need something to roll the dough onto. My mom uses pieces of saran wrap on the counter sprinkled with flour to roll the pie crust out on. I use that method sometimes, but I also have a large plastic cutting board sheet that I can roll the dough onto (lightly floured also) and I tend to use that more often.
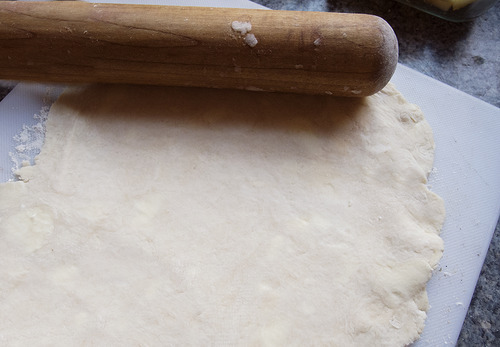
I usually flatten the ball of pie crust the best I can with my hands, then flour the rolling pin before beginning to roll out the crust. If the rolling pin begins to get sticky at all, flour it, or it will pull chunks of your crust off the cutting board. Roll the dough out as evenly as possible and as thinly as you can without it tearing. It should look something like the picture below.
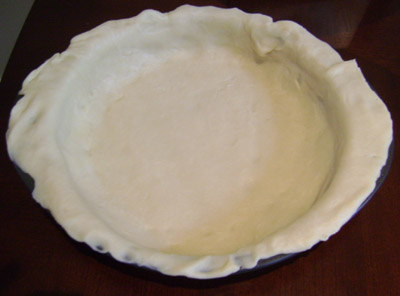
Carefully (super carefully, or you'll have to start over) flip the cutting board over the pie plate so the crust covers the entire dish. The dough does not move easily, so it's important that you aim well the first time. My cutting board is super flat and bends like paper, so it is really easy for me to maneuver the crust over the dish. It should like something like the picture below. If it doesn't look perfect, just remember it's the bottom of the pie so no one will see it anyway.


She makes it look super easy, but I wouldn't pick the pie crust up like she does...it doesn't work.
Anyway, you can pinch the edges, or you can create ridges (which kind of looks more professional...) as shown in the pic below.

Once you have sealed the top pie crust, cut some slits in the center--unless you want an explosion in your oven. I like to do five slits evenly around the center like the five legs of a star. You can get crazy like Snow White and add things on top made from the leftover dough (my mom will roll the extra dough out and cut out mini hearts with cookie cutters to place on top) or you can carve patterns like the person did in the picture below.

 |
| Pre-baking. In my hand is the recipe card I use when making my favorite pie. |
Whatever you choose to do is fine. Now the last step before putting your precious pie in the oven is to stick that 1 Tbsp of butter (mentioned under Pie Filling Ingredients) on the top of the pie to melt into the slits you carved. My mom puts it under the crust, I put it on top. It doesn't matter either way.
Now just stick the pie in the oven (which you hopefully preheated to 425 degrees) and set a timer for 30-40 minutes. (Start with 3o or 35 and check on it). The edges of the pie should be a light brown when it is ready. You'll be able to tell. The pie crust pictured above is a little too dark for my taste as you can see from the very first image, which is the only one here that is actually mine.
Note: It may be a good idea to stick a cookie sheet or some foil on the rack below the pie--especially if yours is overflowing with pie filling. The juices in the pie boil and leak out making a messy oven. If your pie crust is flat across or shrunken in, you probably won't have that problem, but it's better to be safe than sorry.
When your pie is baked to perfection, let it cool for a while and serve with vanilla ice cream if desired. If it isn't delicious, you may have made a mistake. I really hope you love it.
 |
| My pie :) |
Please let me know if you try this recipe! I would love to hear about how it turned out--good or bad. Chances are, this will become your new favorite pie.
No comments:
Post a Comment
I absolutely love to hear from you & will reply if I can!