Wednesday, October 23

DIY Plastic Bag Dispenser & Fridge Cups

Plastic Bag Dispenser
I'm always needing a trash bag while in the car--whether it's for wrappers, receipts, fast food, dirty diapers...etc.--and so I wondered how I could put all those billions of plastic grocery bags that we always have around to use. That is when I saw this awesome tutorial on Pinterest for folding plastic bags so that they come out like wipes from a dispenser.

So I saved a disinfecting wipes container, got out my scrapbook paper and mod-podge, and after cutting the scrapbook paper to the right size and removing the container's label, I painted the mod-podge all over the container and then on the paper to stick it down. It was a little bit messy (mainly for my fingers), but I liked the final result a lot!

Shortly after this project, I brought the re-purposed container down to our car and inserted the rolled up plastic shopping bags (which I rolled ages ago--before I even had a container ready) and it was perfect! I was so happy with how it turned out! My one complaint is perhaps that I wish I had chosen a smaller (thinner) container so that it would fit in one of our eight cup holders, but it still works wonderfully! Now I always have trash bags ready for whatever stinky or sticky thing might be in our car.

What do you think of this idea? How could it be better?


Fridge Cups
I was sick and tired of wasting plastic cups for one sip of juice. Especially since I'm at home now, I feel like I should be finding the time to do dishes. So I loved the idea of a convenient (labeled) cup for the fridge that can be easily accessed and easily rinsed. We had some very cheap plastic cups from Wal-Mart around so I bought some strong magnets in the craft section (it came with like 50) and hot glued them to the cups and then used a black Sharpie to write our names in fun fonts on them. Here's how they turned out!

I have loved them so far but the one thing I wish I could improve is that the marker is gradually rubbing off. Any suggestions on how to keep it looking nice? I've thought of a few things, but none would be washing friendly.

Tell me what you think of these crafts ideas and let me know if you think of ways that they could be improved! 

Tuesday, October 22

DIY Stone Mat

I love the ocean. And I love ocean rocks. I love how smooth they feel and how they smell of sea salt. I especially love heart-shaped rocks and, like my mom, I have a pretty great collection started. 
With so many rocks in decorative buckets and jars that I didn't know what to do with them, I decided to seek out some ideas on Pinterest. And this was what I found! An ocean stone mat!!!! I immediately loved the idea because I love feeling them beneath my feet, so I hastily went and bought the materials. 
Translation: I went to the Dollar Store and found a Welcome mat for $1. They didn't have black which was the only bummer.
I already had the rocks and glue gun, but if you need smooth stones, craft stores and Wal-Mart have them and the Dollar Store even had smooth "river" stones which look different than the ones I used but would have worked fine. Note: You use a heck of a lot of hot glue sticks. Like twenty-five or so, if I were guessing. So stock up if you don't have many!


I chose to do a light to dark pattern for my mat but I could have done it randomly or perhaps made a heart pattern in the middle. I wasted kind of a lot of time placing the stones so they would fit well together, only to have the mat move and mess up my progress, so I would just start in a corner and move across, placing only six to eight at a time before beginning to glue them down. I used a permanent marker to darken the edges of the mat and also around the corners of the rocks as went so the green underneath wouldn't be so noticeable. (Unfortunately, I didn't think to do this until I was more than halfway through.) 
This was my mat when I had gone through all the rocks that I had already. Well, all the ones that worked for this project. Some were too big or too round.

Thankfully, my mom was able to send some at the bottom of her next package!
 Here is the finished product in front of our kitchen sink! I love how it turned out and I love how it feels under my feet!
As you can see! ;)

Let me know what you think of this project or if it's something you would make yourself!
Can you think of a way to improve it?
How many heart-shaped rocks can you spot? (There are more than a dozen in there!)

Friday, October 18

Grandpa French's Famous Apple Pie

I'm naming this after my Grandpa French because it was his recipe and it's amazing in all its simplicity.

Pie Filling
6-7 peeled apples (I prefer Jonathan apples)
1 tsp. ground cinnamon and/or nutmeg (I do mostly cinnamon and a few dashes of nutmeg)
3/4 cup sugar

Wash the apples, then peel them. Slice them into bite-size pieces (you can cut them into ice-cube shapes or, if you have a fancy spiral peeler like my mom, you can cut them into flat pieces. Mix well with sugar and cinnamon/nutmeg and let sit while making the pie crusts. (The flavor will soak into the apples the longer it sits).

Pie Crust Recipe (made twice--first for the bottom crust, then for the top crust. Doubling doesn't seem to work as well for me)
1 stick salted butter (softened--not melted--maybe stick in the microwave for 10 or 15 seconds if it's really solid)
3 Tbsp shortening (I use Crisco)
1/4 tsp salt
2 cups flour
3-5 Tbsp cold water (start with 3, add more as needed)

Mix the first three ingredients together--well--before gradually adding in the flour. Mix well until the pieces are blended. Start with 3 Tbsps of cold water and mix (you will want to remove your rings and knead by hand eventually) until blended. You may need a little more water, but try blending everything before you add any.
Once the dough is blended into a ball, remove from the bowl and place on a floured, flexible cutting board (my mom uses saran wrap laid onto the counter). Note: Know that you need to roll it out onto something that bends so that it's easier to flip the first rolled out crust into the pie dish for the bottom of the pie, and the second crust onto the filling for the top. Flatten the dough with your hands the best you can before using a rolling pin. Make sure you flour the rolling pin so the dough doesn't stick.
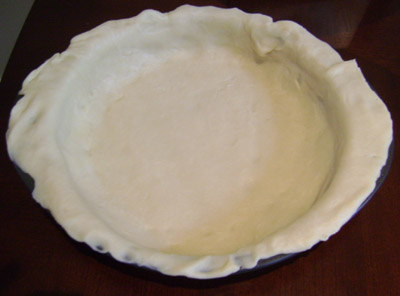
Note: this is not my picture and the pie crust should NOT have visible chunks of butter. Blend more if that is the case.
This is my picture, excuse the blurriness.
When you have rolled out the dough to a circumference greater than that of the pie dish, carefully (lifting the flexible cutting board or saran wrap) flip the bottom crust into the dish. You'll want to be careful to aim well the first time so that the dough covers the entire inside of the dish or you'll have to start over. My cutting board is very flat and bends like paper so it is really easy for me to maneuver the crust over the dish. If the dough doesn't look perfect, just remember it's the bottom of the pie so no one will see it anyway.
You do not need to grease the dish because the dough already has plenty of butter and shortening in it. Gently smooth the bottom crust out, then, using a knife, cut around the pie dish so that the extra dough hanging over falls off. You don't need that dough.

Add your filling to the pie dish and smooth the top with a spatula so the top pie crust won't be so lumpy.
Make the second pie crust and take your time because the appearance of this one matters a little more than the bottom one did.

Take extra care when you place the rolled out pie crust on the filling this time because it's not as easy to re-do once it has touched the filling. Once in place, cut off the excess dough and pinch around the edge of the dish, sealing the pie shut. There are a number of ways you can do this. I just pinch it all the way around.
Cut some slits in the crust (otherwise your pie crust just might explode while baking ;). Then you bake the pie at 425 degrees for 30-40 minutes (check after 30--in my oven, it's done by then). When you're done, it should look something like this!

Let cool for at least five minutes before eating! Enjoy hot (or warm) with vanilla ice cream! Yum!

Let me know if you try this recipe and how it turns out for you!

Monday, October 14

Scrabble Square Pillows

I saw this cute idea for Scrabble square pillows on Pinterest and decided to make some for our apartment. The problem was, my sewing machine is back home in New Hampshire. Thankfully, my mom helped me out. I asked her to find a light-colored canvas fabric and sew four square pillow cases for me with just a three or four-inch opening. She found the exact fabric I'd described and sewed them--perfectly--and mailed the cases to me in Utah. 

When I received them, I used a ruler and drew the letters and numbers on the pillows in pencil. I mixed black acrylic paint with fabric paint then I carefully (and slowly) brushed it between the outlines of my letters and numbers. It took a long time. I put a thick piece of paper on the inside of the pillowcase so that the paint wouldn't bleed through to the other side. I probably could have put painter's tape or something similar down on the pillows to keep the lines nice, but I have a pretty steady hand so I just winged it. I couldn't decide between the letters for "home" or "love" so I decided to do both. Luckily, both words share the same vowels, so I just needed to paint an L on the back of the H pillow and a V on the M one. I looked up the point values for each letter online so I could paint the correct number. I let them dry, stuffed them with white stuffing from Michael's, and then had Dalin sew (with a needle and white thread) each one shut by hand for me so we could say he helped make them. (He claimed his hand and arm cramped up, but the openings in each pillow were only a few inches so it's safe to assume he's fine :P). And voilá! Here are some pics of the finished product! 
We've had the pillows now for almost two years (I made them when we first got married) and they are still in great condition. My main piece of advice would be not to over-stuff the pillows. Leave a little space for the stuffing to fill in. 

Let me know if you try this project or if you need any advice! 

Three Fears and How They Came to Be

I'm (gradually) doing this list from another woman's blog, so that explains the topic.

When I think of my top fears, the first thing that comes to mind is the dark. That can't really be your top fear, you're thinking, but considering it more, I suppose it is more a fear of the unknown that makes this a legitimate concern. I hate dark parking lots. The Wymount parking lot is so dark. At least, in the corner where our parking space is. Sometimes when I would go out at 11pm to pick Dalin up from work, the lights wouldn't even be on yet. (Not that it matters--even when they are on it's still pitch black along the sidewalk to our car). On my way to the car, I get my car keys out and hold them like little knives, ready to jab someone in the eye if they should pop out behind a bush or tree and attack me. I know that sounds super paranoid (especially to any men who might read this) but when you're a small, defenseless woman you have to worry about these things unfortunately because the world is full of messed-up people who would take advantage of a woman because they can. Anyway, I try not to run because I swear running to the car makes it ten times scarier. Because then all of a sudden you're being chased (in your mind) by a creep like on those zillions of crime shows you've seen and the only thing you can do is jump in your car and hit the locks as fast as you can. Having Tenley has helped slightly with this fear--only because I know that I am not going to let ANYTHING happen to my baby girl, so if someone were to attack us, they'd better watch out. I think most women are hard-wired to be scared--or at least wary--of threats to their safety which is why the dark can be so scary. You just don't know who or what could be out there. As a child, I always ran from the bathroom back to my room in the middle of the night and dove onto my bed so nothing could get me. And going down into our basement to get something was always an awful task. While I was downstairs, I would make someone in my family listen to me talk (from upstairs) and reply back so they would know if something happened to me. Yeah. Now I think I've made my little brother paranoid because he hates going down into the basement, too. These pins from Pinterest describe me pretty well.

Yeah, so that is kind of two fears--the dark and bad people, so I'll just give you my third.

It's so clichĂ© but I'm afraid of spiders. Maybe I should make this broader--I'm scared of being bitten by poisonous things (so poisonous snakes, insects, and scorpions, too). I never thought of myself as afraid of these things until I left New Hampshire. I used to hold daddy long-leg spiders in my hands when I was a kid growing up there (though the idea grosses me out now). New Hampshire has no poisonous spiders or snakes that I have ever seen. I did do some research though and learned that we have one poisonous spider (the Northern Black Widow) which has reportedly "never been seen in the wild," and the only reason we have it is because of produce transported from other states (mainly California grapes). We also have one venomous snake in the mountains (called a Timber Rattlesnake) but it is very rare and protected by the state because there are so few of them. No one I know has ever seen a black widow or a rattlesnake in all their time living in New Hampshire. We have no scorpions--it's too cold in the winter. What we do have are ticks, some of which carry Lyme Disease. Those are pretty gross little parasites and I can't say they aren't disgusting, but they have to be attached to a host for at least 36 hours for the disease to be transmitted, and my mom, her sister, and a few of my cousins have gotten Lyme Disease from ticks and live normal lives because they've been treated. Anyway, the point is, when I moved west, I became extremely afraid of poisonous spiders and snakes in particular. It was probably those stinking documentaries I watched on Discovery Channel about the desert with its rattlers and scorpions that made me so wary. If I hadn't seen any, I might not be so freaked out. While hiking with Dalin in Provo Canyon the day he proposed to me, we saw three huge snakes and while in Arizona we saw little poisonous scorpions and my fear unfortunately has not lessened since. Our apartment here in Provo has some disgustingly huge spiders living around it. The other day I say the freakiest, hugest spider I've seen since living here on the outside of Tenley's window. All I could do was make sure the window was shut tight and hope it doesn't get in somehow. This baby was over our bed one morning.

So there you have it. Those are my fears. I wish I could say that I didn't have any more, but I do--these are just my top three. I'm also afraid of drowning (I'm not a confident swimmer), my family dying from something other than old age, and of dying in a drawn out, painful way. Phew, I'm glad this post is over. Hopefully none of these will ever happen to me or you. Or anyone.

What are your greatest fears and why? 

Do you have any irrational fears?